At Bravo Studio we are constantly looking for ways to highlight what is possible just by using APIs and a mobile app design. Recently my good friend Nicolas at Typeform suggested it would be interesting to extend our example adventure app to not just list adventures but also to allow them to be rated and display the average rating for each adventure (it would also be a great example that other users can base their own ideas on). Challenge accepted!
I will explain the detail below, but if you just want to copy the examples to experiment with just go to the end of the article.
In the Air(table) tonight
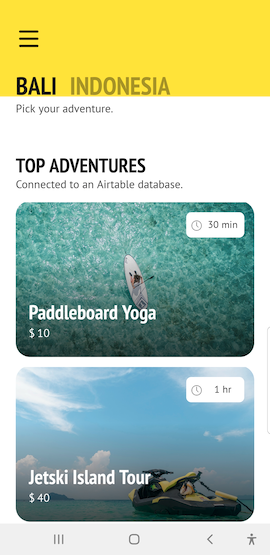
Now our adventure app (one of our example apps in the resources page here) is easy to connect to its data in Airtable (its one of the best online data stores with great API support). But the challenge here was that we had to also record the user rating and provide an average.
So there are 3 parts to the app:
Display the list of adventures from Airtable
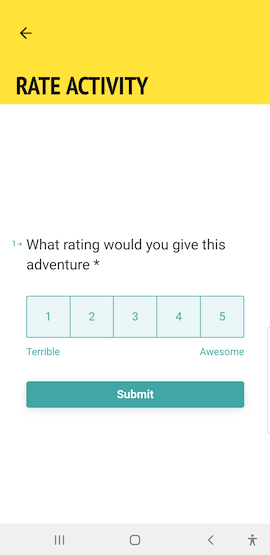
In the detail on an adventure allow input on rating the adventure
Compute the average of all the ratings of an adventure and add that to the adventure information which can be displayed as a list.
Now the adventure app already does step (1), so the first issue was how to collect the users rating. Although Bravo Studio does allow direct users input at the time of writing we don’t have beautiful rating input field, so we thought for this exercise we could use a 3rd party tool to collect this information. Now I am a little biased, but there are not much better tools for collecting data than Typeform (especially as it was Nicolas who made the suggestion), so we added a simple rating question as a webview.
To make a better user experience, I had to ensure the rating for an adventure was stored for the right one without asking the user each time. There is a really useful feature in Typeform called hidden fields (you can learn more about them here) which lets you personalize a Typeform by including it in a URL parameter when you do the initial call to the Typeform. This hidden field data is then available for logic or personalizing the Typeform, i.e. you can use it to display the respondents name in a question.
In our app, the url for the Typeform to collect the rating (here the hidden field is called adventureid and the id itself is generated in Airtable from the adventure name):
https://codelesslabs.typeform.com/to/b9UeVj?adventureid=paddleboardyoga
The resulting typeform in the app:
Moving on Up
So now the data is in Typeform but I needed to work out the best way of getting it into Airtable. Again there are a number of options, you can use the Typeform connector in Airtable, the Airtable connector in Typeform or even use a third party connector like Zapier.
There are pro and cons for each of these options; for example Typeform’s connection to Airtable is immediate whereas Airtable’s connection to Typeform isn’t. In the end I decided to use Zapier, as its multi-zaps allows you to do a series of steps on every Typeform submit which is important as we need to link the table of ratings we get from Typeform in Airtable to the table of adventures we already have.

In this multizap on every new entry for theTypeform (step 1) we lookup the unique id of the adventure in the adventure table (step 2). To do this lookup we need to ensure that we are passing the Typeform with a unique id of the adventure for the rating (we have to use our own unique id as Zapier can’t search for the record id). So for each adventure we autogenerate a unique id based on the adventure name which can be passed through Typeform as a hidden field.
Finally we pass the adventure record id from the lookup and used it as we create a record in the rating table (step 3) which stores the unique id, the link to the adventure table and the actual rating.
It’s Tricky
At this point we have the rating data in Airtable connected to the adventure table and we need to ensure we update the numbers every time new ratings are received. Now Airtable is a pretty flexible tool, and there are many ways to do things. Indeed they recently created scripting blocks which allow you to actually write code to solve problems.
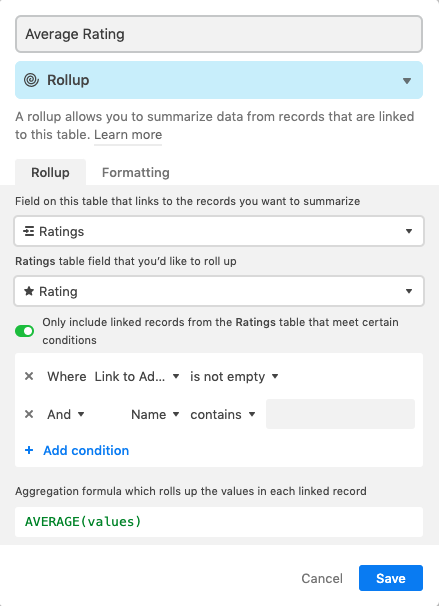
However I really wanted to try and implement this feature as easily as possible, and as much as possible without coding. Now Airtable also has computation fields which work a bit like a spreadsheet functions so I thought I would use those to create the average I needed (having the adventure and ratings table connected really helps with this as you can use a rollup field).
To do this average calculation I created an average rollup field on the adventure table which works on the linked Ratings table. As each adventure has several linked entries in the ratings field you can use the rollup field to ‘rollup’ and average all the related entries in the rating table for an adventure. It looked like this:
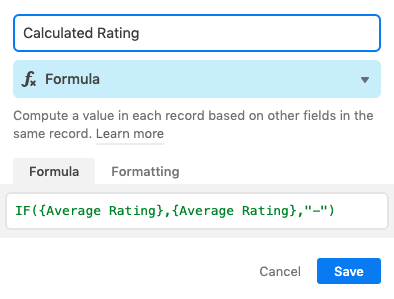
To make the results a little prettier, I added a calculated rating field, this was to make sure that if there were not any ratings, it wouldn’t display NaN (which is the default for an empty rollup), but would display a ‘-’ instead. This was the field that I would display in the app for the rating.
The Circle of Life
To bring everything full circle, I needed to have a way for the app to know which url to call for the webview, making sure it has the hidden field in to specify the relevant adventure.
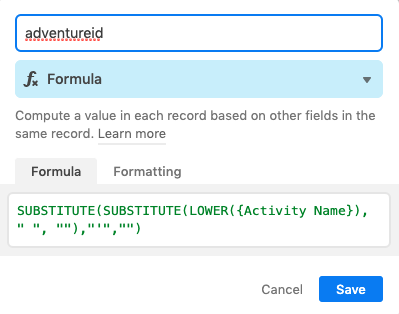
The first step here was to make an adventureid field using a formula that generated an id off the unique name of the adventure (I had to process the text a little to remove spaces and quotes and change to lowercase, to ensure it could be passed as a hidden field in a URL).
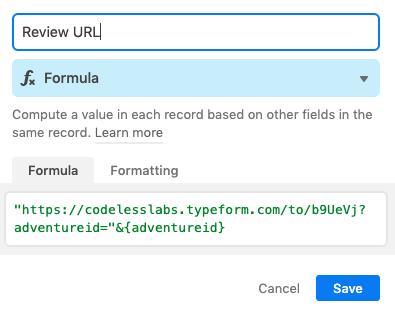
Then I needed to create the URL for each adventure that the app could call to collect the rating. The way I did this was to add a formula field in Airtable which had the Typeform url, but with the hidden field part taken from the unique **adventureid **field.
H(API) feet, I’ve got those h(API) feet
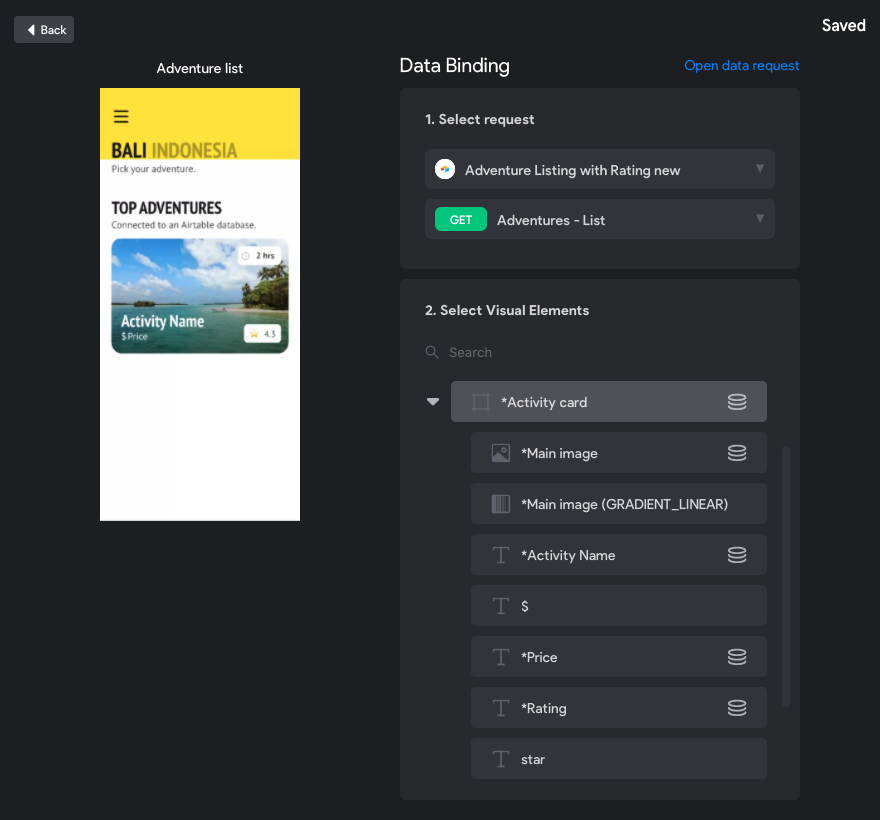
Lastly we need to ensure the design has been bound to the APIs from Airtable. Using Bravo’s API Wizard its easy to add the APIs to the Data Library, and then in going into the project in Bravo you just need to make sure the following are connected
- In adventure list page — Use the “Adventures List request”, bind the Activity Card container to the records and then in the container bind Main image, Activity Name, Price, Rating (to calculated rating), and Length.
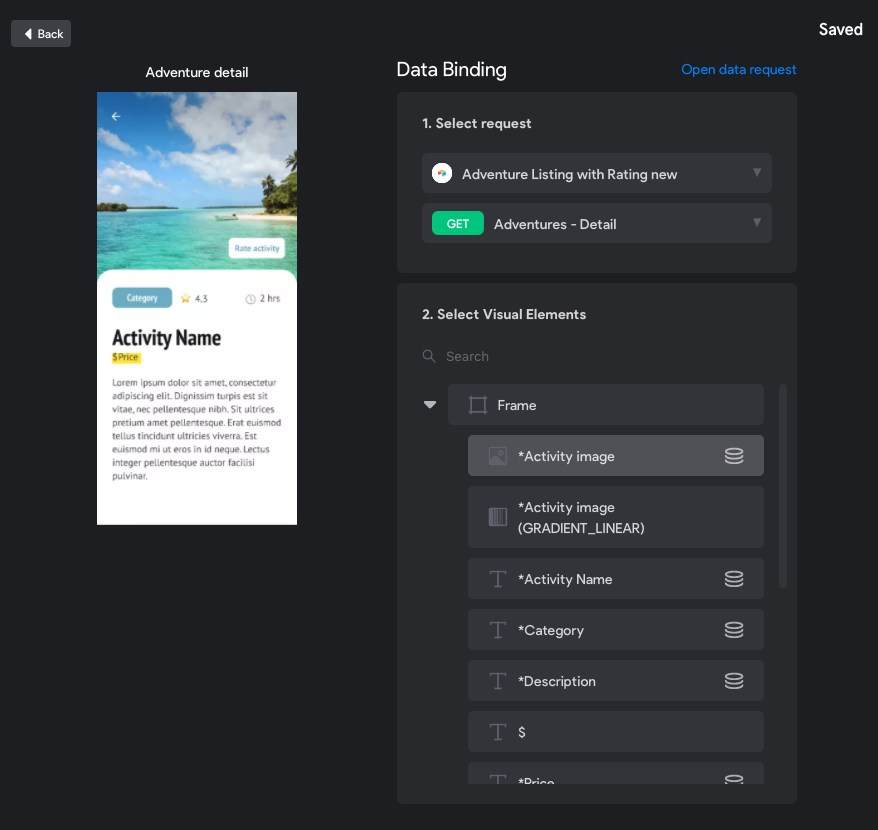
- In the adventure detail page — use the “Adventures — Detail” request and bind the Main image, Activity Name, Category, Description, Price, Time and Rating (to calculated rating).
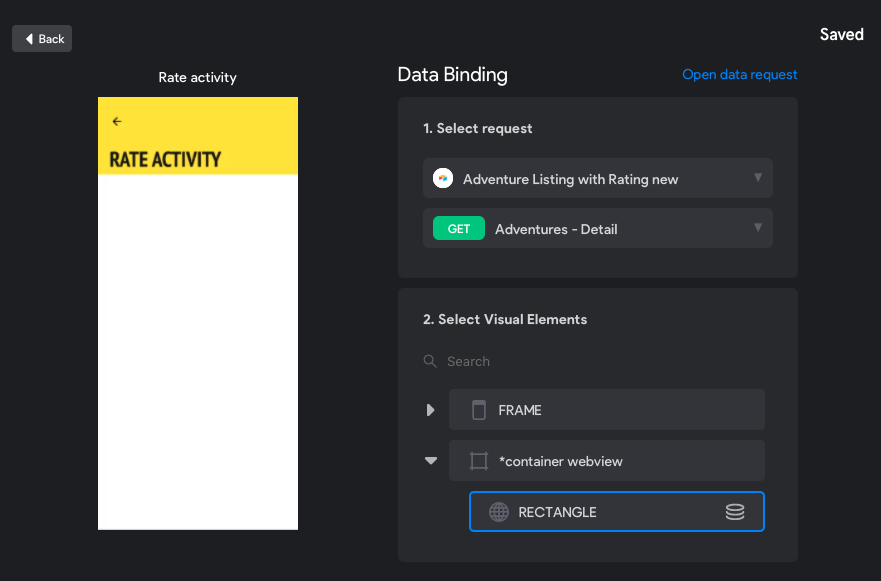
- In the Rate activity page use the “Adventure Detail” request and bind the container webview to the Rating URL.
- That should be it, your app is good to go!
The Final Countdown (also TLDR;)
So that is all there is to it. A Typeform, a couple of Zapier steps and a few clever Airtable fields and you can start to have users rating any information you have stored in Airtable in your own app using Bravo Studio.
You can get the example Figma file here, and clone the Airtable here.
Please drop us a line on the Bravo Studio Spectrum here, if you get stuck with this, or would like to let us know what you created.
Read original article here.